Category Archives: new products and classes

2014

New Christmas Wood now in store…..

This is from the Kaisercraft blog….

 Silly Season: Beyond the Page Creations

by JodiD

Good afternoon crafters!
With Christmas just around the corner, what better time to show you some wonderful creations that can be made for gifts for loved ones from the bright and colourful Silly Season Collection.  This range is so versatile because not only do you have some funky Christmas themed papers, but turn them over and you have some equally funky papers that can be used all year round!!!
In this post, Genevieve, Svetlana, Jodi, Lori, Pearl and Vicki will share some items they have created using this Collection:
******************************
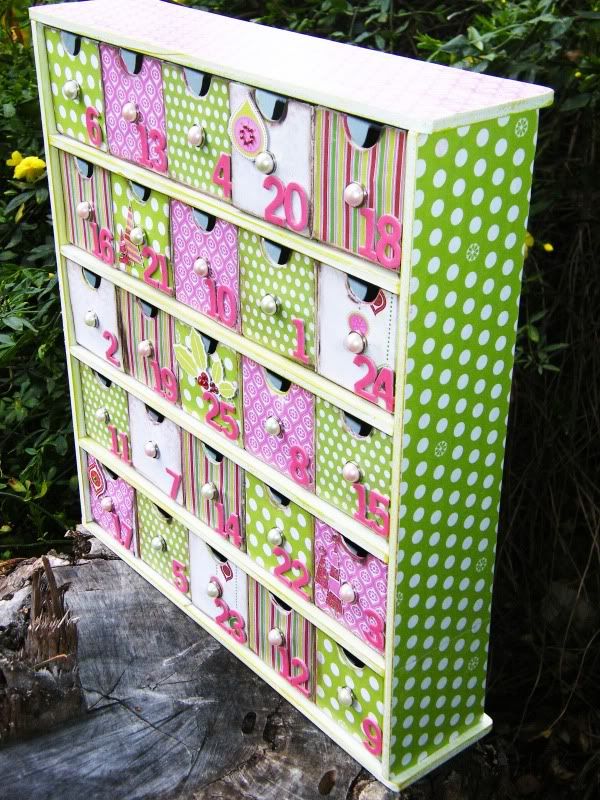
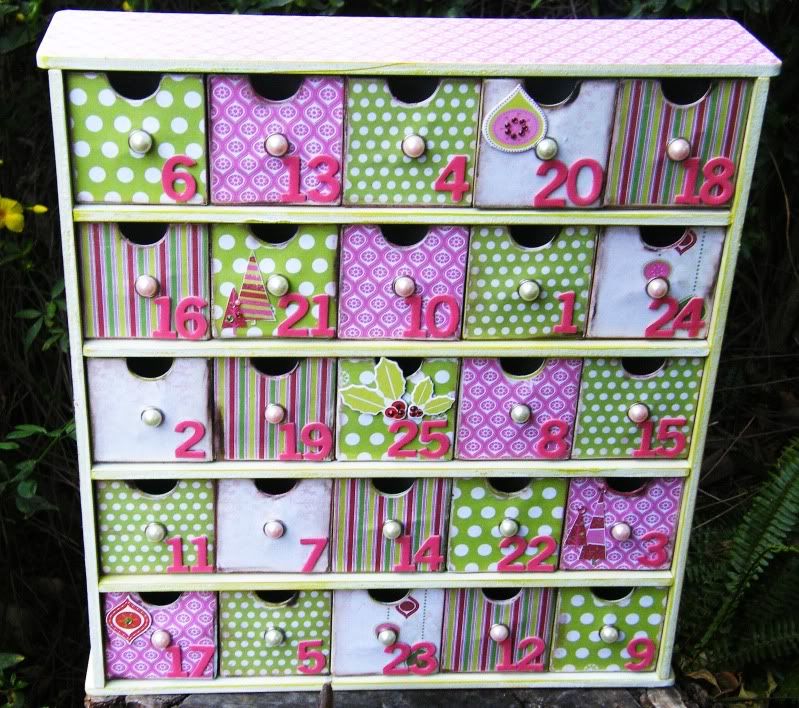
“Advent Chest by Jodi Dolbel”
Side View..
Products Used:
Silly Season Collection Papers – Candy Cane/P726, Fairy Lights/P727, Dasher/PS163, Paper Pad/PP851, Painted Chipboard/CB133, Jewels/RS424, Pearl Brads – Ice Green/EM934, Pink Ice/EM932, Kaiser Colour – Olive/KC046
Other: Jo Sonia Paint – White, Jo Sonia Crackle Paint, Mod Podge
Jodi Says:
“I love this range of papers. Originally I thought I would make a wonderful chest for my daughters bedroom, and just use the backs of the Christmas Pages, but it looked too wonderful to die a natural death in my daughters bedroom, so I added some Christmas Embellishments and the numbers from the 25 Draw Chest Kit to make the advent calender. I think little hands will really enjoy collecting the goodies they will find in each of these little draws leading up to Christmas Day.”
******************************
“Christmas Collection” by Genevieve Allen
Products Used:
Silly Season Collection Papers –
Reindeer: Beyond the page Reindeer/SB2129; Paper Fruit cake/P723; Rub-on/RB937;Other: Distress Stain-Fired Brick-Vintage photo, Glitz Stickles, Pearls, little gem.
Noel Script Word:  Noel/SB2132; Paper Pad/PP851;Sticker sheet/SS111;Rhinestones flourishes/RS463; Sparklets Rouge/RS416; Wooden Flourishes December/FL365;Other: Acrylic paint, Stickles, Dye, Feathers
Christmas tree: Paper: Fairy lights/P727, Fruit cake/P723;Wooden Flourishes Christmas star/FL363;Other: Styrofoam tree, Stickles, Mod Podge, Punch, Pearl, Ribbon.

Genevieve says:
“I have played with the colors and embellishments to achieve a “girly” effect! I added a feather for the word NOEL, earrings and a necklace for the reindeer, pearls and ribbon for the tree.  This Christmas collection is going to be a great decoration for my granddaughters’s bedroom !”

******************************
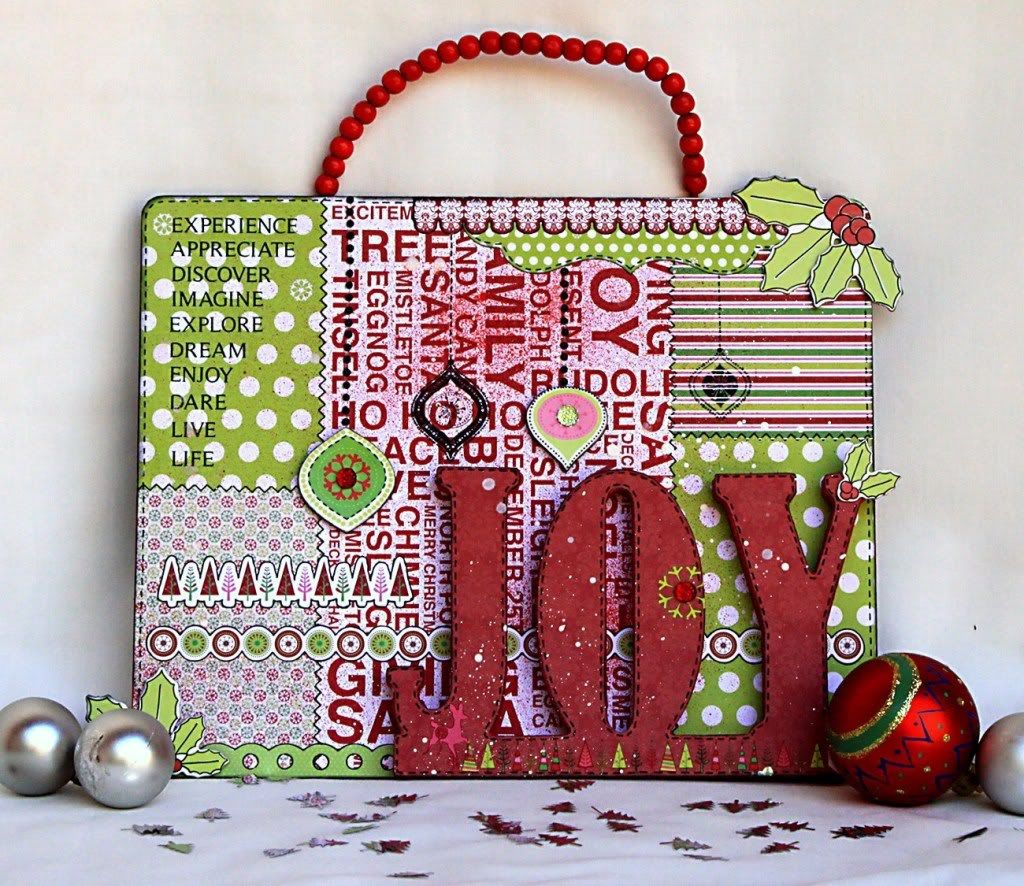
“Christmas Door Hanger” by Svetlana Austin
Materials used:
Beyond the Page – Standing Word JOY; Silly Season Collection: Paper – Candy Cane/P726, Elf/P724, Jingle Bell/P722; Paper Pad/PP851; Sticker Sheet/SS111; Rub ons/RB937; Printed Chipboard/CB133; Clear Stamps/CS791; Sparklets – Rouge/RS416, Fern/RS419; Rhinestone Strip – Black/RS452; Rub Ons – Life/RB903.
Other: craft paint, glimmer mist, black marker, ink, chipboard, wooden beads, string, glue.
Svetlana says:
” To me, the Silly Season collection is a fun and modern take on Christmas traditions. It inspired me to create something funky and a little bit different. Instead of traditional round Christmas wreath with all the usual trimmings, I made a door sign, which will greet my friends during the December month, when they will knock on our front door.”
******************************
“Holiday Recipe Holder” by Lori Williams Leng
Materials used:
Large Mannequin/ SB2123, Printed Chipboard /CB133, White Lace/ EM926, Rub ons/ RB937, Lime Rhinestones/ RS455, Fairy Lights /P727, Elf/ P724
Other Products: clothes pin, distress pin, seam binding.
Lori says:
“Do you remember those adorable little aprons from the 50′s and 60′s ?  That is exactly what I had in mind when I created this project.  It’s a recipe holder that is going to look perfect on my kitchen counter during the holidays.  It would also be perfect for a hostess gift with one of your favorite Christmas recipes to share.”
“Tip: Did you know our Kaisercraft rub ons transfer so easily onto ribbon?  It’s a great way to create your own designer ribbons that coordinates perfectly with a collection.  I added the Christmas Tree border rub onto some plain white ribbon for the sash around the waist.  Just the perfect touch.”
******************************
“Silly Dears” Mini Book by Pearl Lui
Materials Used: Silly Season Milk & Cookies (P728), Gingerbread (P729), Journal Tags (JT626), Printed Chipboard (CB133), Paper Pad (PP851), Jewels (RS424)
Other: Ribbon
Pearl says:
“The Silly Season “Milk & Cookies” pattern paper is awesome for a mini book because it comes printed with natural mini page delineations. My favorite part was embellishing the mini with Jewels, Journal Tags, Printed Chipboard, and die-cuts from the back of the 6.5″x6.5″ Paper Pad.”
******************************
“Christmas Angel” by Vicki Morris

Vicki says:
“What would Christmas be without a fabulous angel decorating your Christmas Tree.  Here I have cut 1 straight circle and 3 scallop shaped circles and used these as a base for the Angel by layering them on top of one another.  Add two cone shapes for the sleeves and add ribbon around the base and neck.

I have used an old Christmas decoration ball as the head which works perfectly as the tie to hang it on the tree was already on the ball!  As another tip – I have used an album ring and wrapped lace and pearl strips around it to make the halo.  Use feathers and Kaisercraft Wooden Flourish: Wings to make the wings.  Add sparklets and rhinestone strips and your angel is ready to fly!”

“Christmas Angel” by Vicki Morris
Materials list:
Kaisercraft – Silly Season – Jingle Bell, Kaisercraft – Silly Season –  Fairy Lights, Kaisercraft – Silly Season – Cracker, Kaisercraft – Sparklets- Crystal and Rouge, Kaisercraft – Wooden Flourishes – Wings, Kaisercraft – Pearl  Strips, Kaisercraft – Rhinestone Strips, Kaisercraft – Album Ring, Misc Ribbon,  Feathers and Christmas ball.

Cupcake Wrappers

Don’t you love how some people have all the matching decorations for their child’s birthday parties? You can buy specially designed printable cup cake toppers, bottle wraps, loot bag labels etc.(as can be seen here in an Etsy store)

But to print out everything would probably cost you at least 1 full cartridge of coloured ink, so to make it a bit easier on your pocket we now have Cupcake Wrapper stencils in stock. Just trace them on to your favourite patterned paper, cut out and wrap around your cupcakes. Its as easy as that!

Using your favourite paper will end up being cheaper and the quality of the paper is much better than printer paper.

See you in store soon 🙂
Marijke

More photos of the new shop on Flores Road.

I know I am a bit behind in up loading photos….you have seen the before photos (or click here to see them) but here are the “during” photos:

Shelves are starting to be filled

Classroom

Boxes everywhere still
Plenty of coffee consumed!

Late Wednesday afternoon we got the go ahead that we could start working in the shop…..3 evenings and 2 full days followed…..I have muscles I didn’t know existed! So many boxes lifted and fittings moved. Although a BIG thank you to the courier across the road for fork lifting the 2 fittings in from the back in to the shop. And a MASSIVE thank you to the ladies (and gentleman) who helped move the fittings, unpack all the boxes and had my kids for sleep overs. I could not have done it without you!

Friday night the shop looked like this:

On Saturday morning I hung up some layouts and put out some of the BTP items so it doesn’t look as bare anymore. As soon as Tony comes home he will be putting up the slat wall along the back.

The blinds will be fitted in the next couple of weeks and the walls will get filled with layouts. The best thing is we felt so safe there late at night. No one banging on the windows, no need to venture outside for the toilet (did I already mention we have not 1 but 2 inside?! lol) no empty beer bottles left outside. On Friday night I was even there by myself for a couple of hours (unheard of in my other shop) and when I left at 9.30pm felt very safe going outside to the car, which means night classes will definitely be happening now. 

What do you think of  the new shop?

Marianne and Nellie Snellie Dies

Our main aim at Scrapbooking in Geraldton is to make paper crafting affordable for everyone. I spend many many hours searching the internet to get the best price possible.

There is one particular brand of dies (no naming and shaming here) that I love but are a bit pricey and a lot of people can’t afford them. So when a friend of mine mentioned Marianne dies I started searching for a distributor.

My first lot of dies only lasted 3 days in the shop so I quickly ordered more, and they are now in store. A number of them sold at our opening on Saturday but I still have plenty more – but be quick as I’m not sure how long they will last.

You can watch a quick demo here….but it is in dutch. Just don’t listen to the sound – the image shows enough 🙂

Or you can come in store and I can give you a quick demo – or try it yourself. 🙂

Christmas Wood

All the pre-ordered Christmas wood is due in the next day or 2. I have ordered extras for those who like to “see and touch” first. 🙂

New In store and top ups:

* Hunt and Gather papers

* October Afternoon 8″ paper pads
* MME Scrap Packs – Birthday boy and Girl
* Urban Albums
* Inks
* Webster Pages Collection Kits
* Stamps
* 7Gypsies Tissue paper
+ lots more

Sneak preview of the new shop on Flores Road

Hello! many of you have asked me what it looks like so here are a couple of photos of the inside…..nearly finished!

The classroom

Aircon still being serviced

My little office

The shop

2 inside toilets! 9so much better than the outside we had at the other shop)

“the back”

The shop fittings that still need to go in to the shop

What do you think?

New Shop

Our new shop is nearly finished with the renovations, The carpet has been laid down in the shop, the walls are painted, a new kitchen sink in the classroom, toilets have been replaced, the lino in the classroom in being laid down today, the little kitchen out the back has been fixed, (Yes I have 2 kitchenettes 🙂 ) my little office has been freshened up with a fresh coat of paint.

Still to be done: the aircon is being serviced (reverse cycle! and the full shop and classroom are airconditioned!!), new light covers, skirting boards, big clean up and then of course filing the shelves! Can’t wait for it all to be finished.

I will post some photos tomorrow.

Hope everyone is having a great weekend!

Marijke

Bird Cage

On Sunday we moved everything out of my little shop in to the back of the new shop. While its being finished off I am having a few days off. Time to catch up on the housework, spending more time with the kids and creating. Yesterday was the first day in over 2 years that I had the chance to be home alone. My princess was as school and the boys in daycare, and my husband works away so wasn’t home either.
I turned on my favourite music and started working on a birdcage.

These are a new release this month from Kaisercraft. We sold quite a few of them at the craft show in Melbourne and I have been itching to make one…..

I painted the cage using “mud puddle”.

It was a bit fiddly painting in between all the bars. I painted 2 layers of paint and 1 of modge podge.

The Bird Cage measures approx. 17 inches high – much bigger than a toddler’s head 🙂
The wood flourishes were coloured using a mini ink pad.

roses were made using circles using paper from the paper pad.

Finished Bird Cage.

The Bird Cages (as well as the Oriental one) are available from our store.
Also in stock Wood Flourishes, ink pad and paint.